DSC Experiment Setup: A Beginner’s Guide to Running Your First Test
DSC Experiment Setup: A Beginner’s Guide to Running Your First Test
DSC Experiment Setup: A Beginner’s Guide to Running Your First Test
What You Need Before Starting a DSC Experiment
Before running your first DSC experiment, ensure that the instrument has been properly calibrated and that you have the necessary supplies on hand. You will need DSC pans appropriate for your sample and measurement (standard aluminum pans for most applications), a microbalance for accurate sample weighing, tweezers and other sample handling tools, and the appropriate purge gas supply.
Familiarize yourself with the instrument software by reviewing the user manual or taking a training course from the manufacturer. Understanding how to create temperature programs, start measurements, and perform basic data analysis will help your first experiments run smoothly.
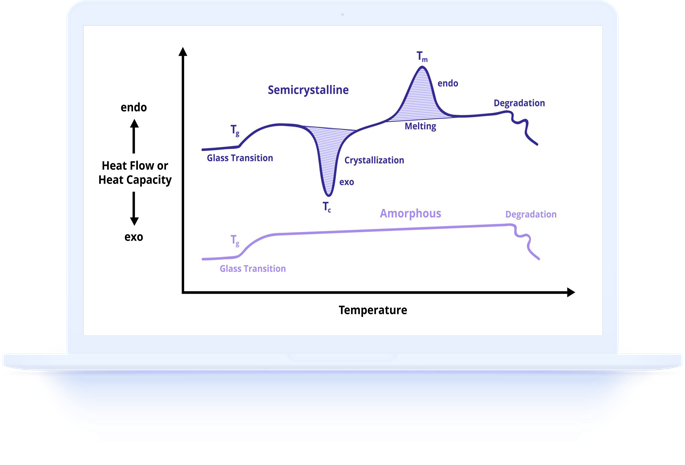
Know what you expect to see in your DSC results before you begin. Research the expected thermal behavior of your material type so you can verify that your results are reasonable and identify any unexpected features for further investigation.
Step-by-Step: Setting Up a DSC Run
A standard DSC experiment setup involves several sequential steps. First, select and weigh an empty DSC pan and lid on the microbalance and record the mass. Then, place your sample in the pan and reweigh to determine the sample mass by difference. Crimp the pan using the appropriate press tool.
Prepare a reference pan using the same type of pan and lid, crimped identically but empty. Both the sample and reference pans should be the same type and configuration to minimize baseline artifacts from pan differences.
Place both pans on the DSC sensor, with the sample pan on the sample position and the reference pan on the reference position. Ensure both pans sit flat and centered on their respective platforms. Close the cell lid and allow the system to equilibrate before starting the measurement.
Sample Weighing and Pan Loading
Proper sample loading is essential for good DSC results. The sample should sit flat on the bottom of the DSC pan to ensure optimal thermal contact with the sensor. For powdered samples, spread the material evenly across the pan bottom. For films and solid pieces, cut a flat sample that fits within the pan.
Sample mass should be appropriate for the measurement. For most applications, 5 to 15 milligrams provides a good balance between adequate signal and minimal thermal lag. Use less material (2 to 5 milligrams) for high-enthalpy events like metal melting or precise purity analysis. Use more material (15 to 25 milligrams) for weak transitions like the glass transition of highly crystalline polymers.
Always weigh the empty pan first, then the pan with the sample. The sample mass is the difference between these two measurements. Record masses to at least 0.01 milligram precision, as mass accuracy directly affects the accuracy of all specific (per-gram) results.
Programming the Temperature Method
The temperature program defines the heating, cooling, and isothermal segments of your DSC experiment. A basic heating experiment might consist of: equilibrate at the starting temperature, hold isothermally for 2 minutes to stabilize the baseline, then heat at 10 degrees per minute to the end temperature.
For polymer characterization, a common protocol uses two heating scans: the first scan from below the glass transition to above the melting point reveals the as-received thermal history, followed by controlled cooling and a second heating scan that shows the inherent thermal properties without processing effects.
Set your temperature limits to include adequate baseline before and after each thermal event of interest. Start at least 30 degrees below the lowest expected transition and end at least 30 degrees above the highest expected event. This ensures clean baseline regions for accurate peak integration and transition analysis.
Choosing the Right Heating Rate and Atmosphere
Heating rate selection balances sensitivity against resolution and measurement speed. A rate of 10 degrees per minute is the industry standard for most DSC applications, providing a good compromise between signal strength and thermal lag. Slower rates (2 to 5 degrees per minute) improve resolution and temperature accuracy, while faster rates (20 degrees per minute) increase sensitivity for detecting weak transitions.
The purge gas atmosphere should match your measurement objectives. Nitrogen is the default choice for most measurements, providing an inert environment that prevents oxidation. Use oxygen or air for oxidative stability testing. Helium improves thermal conductivity and sensitivity but is more expensive than nitrogen.
Purge gas flow rate is typically set between 20 and 50 milliliters per minute, following the instrument manufacturer’s recommendation. Consistent flow rate between calibration and measurement runs is important for reproducibility.
Analyzing Your First DSC Results
When analyzing your first DSC results, start by examining the overall curve shape and identifying the major thermal features. Look for step changes indicating glass transitions, endothermic peaks indicating melting, exothermic peaks indicating crystallization or curing, and any baseline drift or artifacts.
Use the software’s analysis tools to measure onset temperatures, peak temperatures, and peak areas for each thermal event. Compare your measured values to expected values from literature, material data sheets, or previous measurements to verify that your results are reasonable.
If results seem unusual, consider whether the sample mass was accurate, whether the pans were properly crimped, whether the temperature program was appropriate, and whether the instrument was properly calibrated. Running a known reference material under the same conditions helps distinguish sample effects from instrument issues.
Common Beginner Mistakes and How to Avoid Them
The most common beginner mistakes in DSC include using too much sample (which broadens peaks and increases thermal lag), using the wrong pan type (which can cause reactions with the sample or leakage of volatile components), and setting inappropriate temperature ranges (which can miss important thermal events or damage the instrument).
Other common errors include poor thermal contact from improperly loaded samples, inconsistent pan preparation between sample and reference, insufficient equilibration time at the starting temperature, and misidentification of artifacts as real thermal events.
Rushing through sample preparation to save time almost always produces inferior data. Taking an extra few minutes to ensure accurate weighing, proper pan crimping, and correct instrument setup pays dividends in data quality and avoids the need to repeat measurements.
Let Our Experts Run Your DSC Tests
If running your own DSC experiments seems daunting or if you need results from properly calibrated, quality-controlled instruments operated by experienced analysts, our testing laboratory provides professional DSC services for all applications and material types.
We welcome samples from researchers, students, and industrial clients who need reliable thermal analysis data without the investment in equipment and training. Contact us to discuss your testing needs and receive a quotation.